


All beading graphics on this page were created by Kimberly Chapman, and are my exclusive property. Feel free to link to this page, but please do not steal the graphics and pictures. It took hours of work to make them. If I find them elsewhere on the Internet, I will consider pursuing legal charges against the site owner.
When desiging with the regular brick stitch, remember that each row is askew of the one before it. This means you can only draw perfectly straight lines horizontally. Vertical lines must wiggle with the brick pattern.
Because those normal cheap seed beads vary in height, you should plan your patterns very carefully. Look at the beads you have before including certain colours in the pattern; does the colour you want to use in a given location tend to vary greatly in height from the colours that will be on either side of it? If the variance is only for a row or two, it should be fine. If the variance goes on for many rows, however, you'll find that the piece becomes warped. To combat this, either choose colours of complimenting heights, or plan to do a double row of the thinner colour somewhere in the piece. You don't necessarily have to draw this into the pattern, but you should keep in mind during the design.
Alternatively, you can use more expensive but more consistent glass seed beads, such as Mill Hill or Delicas.
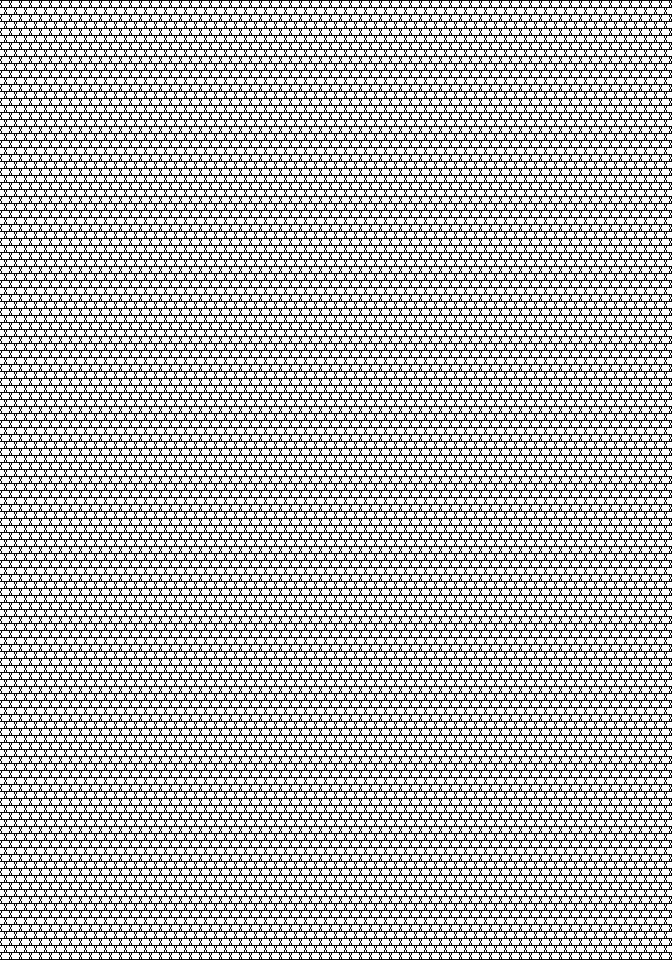
I have gone through several variations of a template to design brick patterns, often finding that the bead sizes were too wide/short, making my design turn out squished-looking. Below is my current template that seems to fit most of those cheap plastic beads on a good average. To download it, right click if you have a Windows PC or Command-Click if you have a Mac, then select "Save Picture As" from the menu that appears. Depending on what graphic program you use, you may need to convert it to another form in order to draw on it. I use the Paint utility that comes with Windows, which uses Bitmap (.bmp) format. To quickly save it as a Bitmap instead of having to convert it, Windows users can select Bitmap from the "Save as Type" pull-down on the save screen.
To design in Paint, use the fill tool (looks like a bucket pouring) to colour each bead as desired. Note: the lines are black. If you fill a bead with black and then wish to change the colour, you'll have to do it manually instead of by fill, because using fill will change all of the template lines to another colour as well. To avoid this, I don't fill anything in as black until the design is complete, and I use a substitute dark colour until then (one that I'm not already using elsewhere in the pattern).
Use this link to view this page with my preferred colour and font settings.
Page last updated December 4, 2003.
Email me at crafts@kimberlychapman.com
If you want to receive notification of updates on any portion of this site, simply enter your email address here and click/select the button to enter. You will be required to sign up for a free Yahoo! account to complete registration. Please note that Yahoo!'s privacy policy and other management are outside of kimberlychapman.com's responsibility. Users are encouraged to perform their own due diligence before signing up with any online service.
To find out more about the list or read messages without signing up, please visit the Yahoo! page for the kimberlychapman updates mailing list.
For more information on what these tags mean, please see About KimberlyChapman.com.