Copyright © 2005-2008, Kimberly Chapman. All knitting graphics/patterns/instructions on this page were created by Kimberly Chapman. You may link to this page, but please do not steal/hotlink the graphics or copy the patterns to other sites without my written permission. Feel free to print graphics/patterns/instructions for personal or non-profit use, but absolutely no for-profit reproduction is allowed, including selling of finished items (except for registered charitable causes).


Knitting Tutorials - Knitting Patterns - Knitting Gallery - Little Dudes - Knitting Books - Yarn Storage - Knitting Links


Knitting A Twisted Tube With Double-Pointed Needles

The following photos illustrate how to use double-pointed needles to knit a self-twisting tube. This tutorial assumes you already know the basics of knitting and how to use double-pointed needles to make a basic tube. If you do not know the basics, please see the excellent tutorials at LearnToKnit.com.

Various projects I've made using these twisted tubes can be found in my knitting gallery. The needles pictured here are size US 3.

These instructions show how to do a left-handed twist. See the bottom of the page for how to do a right-handed twist.

Knitting a Twisted Tube with Double-Pointed Needles Step 1[d]

Start a basic tube. This can be done from the total stitches needed, or as shown here, starting from a point and adding stitches until you have your desired total (in this case twelve, or four per needle). I find that it's best to have a couple of normal rows knitted all the way around before starting a twist.

Knitting a Twisted Tube with Double-Pointed Needles Step 2[d]

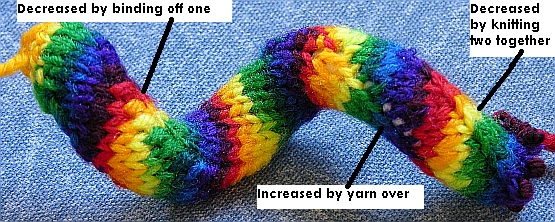
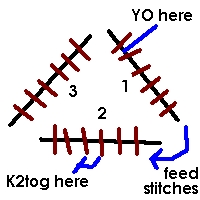
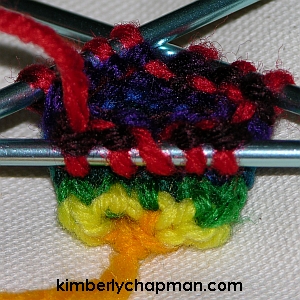
At the start of a row, knit two stitches together to drop one. I find that it's easiest to insert the double-pointed needle backwards through the first two stitches and then down, rather than coming in from behind the second stitch in the row.

Knitting a Twisted Tube with Double-Pointed Needles Step 3[d]

As with normal knitting two together, pull the loop through and then leave the new stitch on the new needle.

Knitting a Twisted Tube with Double-Pointed Needles Step 4[d]

Finish knitting this section. You will be left with one stitch less than a normal count for this needle (in this case, three stitches).

Knitting a Twisted Tube with Double-Pointed Needles Step 5[d]

On the next needle (which should be your middle/second needle), knit halfway along. If you have an odd number, decide at the start whether you will be rounding up or down, but stay consistent to that through the whole piece. I generally round up, so if there were five stitches, I'd knit three.

Knitting a Twisted Tube with Double-Pointed Needles Step 6[d]

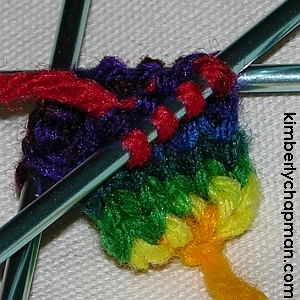
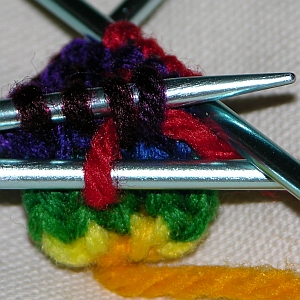
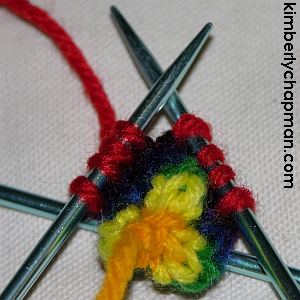
Put the yarn over the needle to add a stitch, as a normal yarn-over move. Then knit the next stitch.

Knitting a Twisted Tube with Double-Pointed Needles Step 7[d]

Complete the row along this needle with normal knitting. You can see the added stitch in the photo. This needle should now have one more than the usual count; in this case, a total of five stitches.

Knitting a Twisted Tube with Double-Pointed Needles Step 8[d]

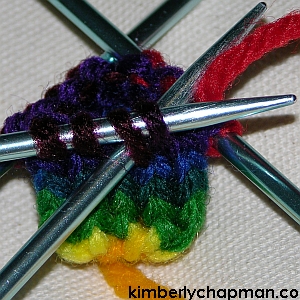
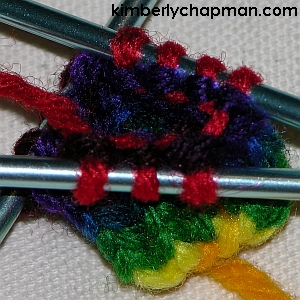
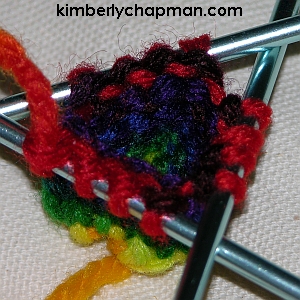
As you repeat this, the middle needle will always have extra stitches and the first needle will run out if you don't even them up. Simply slide the stitch on the end of the middle needle closest to the first needle over onto the first needle. Be sure to move it directly, not twisting it at all. In this photo from below, you can see that the first and second needles each have four stitches again now.

Knitting a Twisted Tube with Double-Pointed Needles Step 9[d]

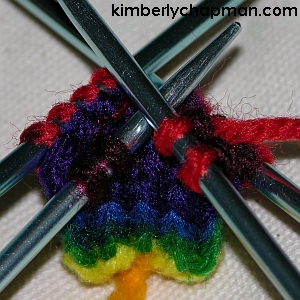
Knit along the third needle as normal to complete the entire row. The count on this needle will never change. That's what makes the twist happen: the fact that you're continually moving/feeding extra on the other needles and not touching this one.

Knitting a Twisted Tube with Double-Pointed Needles Step 10[d]

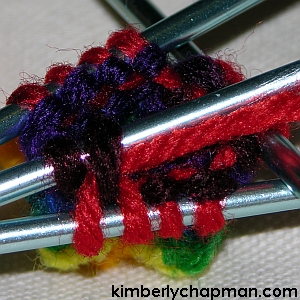
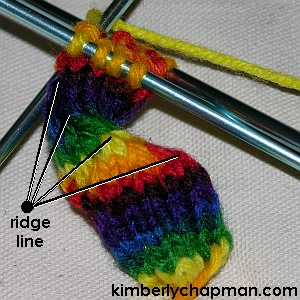
Simply continue to repeat the above steps over and over, and soon you'll see a twist emerge. Where you've been dropping stitches (knitting two together), you'll start to see a ridge line forming. Should you forget what point you're at when you've put the knitting down for awhile and then come back to it (if like me you don't bother with row markers), simply locate this obvious ridge. Wherever it joins a needle, that's where you want to knit two together again.

Knitting a Twisted Tube with Double-Pointed Needles Step 11[d]

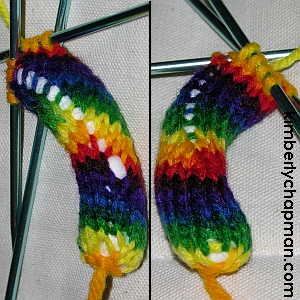
I strongly suggest stuffing the tube every few inches, because as it twists it gets harder to push stuffing down through it. Be sure to stuff as rigidly as you intend for the final piece, since it's almost impossible to cram stuffing down beyond a few inches.

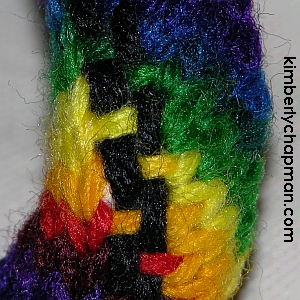
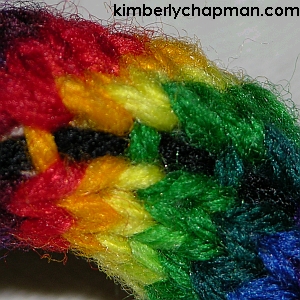
Once you start stuffing the piece, you will see big holes where you've added stitches (left side of the photo), and smaller ones where you've been dropping stitches (right side of the photo along the aforementioned ridge line). Depending on the desired outcome, you could either leave the holes as they are, stitch them closed, or my favourite technique as shown below: weaving other yarn through them.

If you find that you haven't stuffed enough, you can use these holes to push in extra stuffing, but you have to work with small amounts and it can be rather fiddly.

Knitting a Twisted Tube with Double-Pointed Needles Step 12[d]

For the bigger holes, I recommend weaving multiple times through to cover up the stuffing. The yarn you use can be anything you want. In this case I chose black because it best complimented the rainbow, whereas using the rainbow yarn ended up with mismatched colours along the rows themselves. I wove the black yarn through from end to end once, using a yarn needle, and then back again the other way with an opposing weave (hence the step look). You could also weave the same both ways, or weave two rows through at once, or as in the case of my big green snake, I wove a yellow, orange, and red line through simultaneously because the holes on that piece were very large.

Knitting a Twisted Tube with Double-Pointed Needles Step 13[d]

Similarly, for the smaller holes, weave through once or twice, as required/desired. The size of these holes depends strongly on how well-stuffed the piece is. A softly stuffed piece may not require any weaving on the ridge line at all. The yarn you use here doesn't have to be the same as what you used on the other holes; for my big green snake, I used matching green yarn on this line.


Right-Handed Twist

Thanks to input and tests from lots of friendly folks, I've finally figured out how to do a right-handed twist as needed for my DNA model. At first I just tried shifting the increase and decrease, then I tried shifting the flow of stitches, but neither worked. It seems you have to do both, so my apologies for not getting it right for so long!

Many people suggested alternate means of increasing or decreasing, but as my sample below shows, that doesn't matter so much as long as you do the increasing and decreasing in a way that shifts the stitches the proper way around.

The sample below increased the first stitch on the first needle using a knit back-and-front addition and decreasing at the midpoint of the second needle using a single cast-off stitch. Once it was clear that the tube was twisting to the right, I reverted to my preferred yarn-over and knit-two-together method, ensuring that the yarn over was done between the first and second stitches on the first needle, and the two together was always the last third and fourth stitch on the second needle. Shifting was done from needle one to needle two.

You can see that the twist continues regardless of how the increases or decreases are done, but the various stitches produce different types of bumps. All of the increases produced holes, but the yarn-over is smoother in my opinion, especially for varigated yarn. The diagram shows where to add, shift, and decrease to make the tube twist to the right:

A rainbow twisted tube showing how various stitches look.
A diagram illustrating how to add stitches for a right-handed twist.

Inside-out

I haven't taken a picture of this one, but I did turn a tube inside-out and it didn't reverse the direction. Furthermore, for the DNA model in particular, one must stuff as one knits in order to achieve a suitable firmness to the stuffing. Waiting until the end - which turning it inside-out would require - means less compacted stuffing.

Knitting backwards

I haven't tried it myself, but several people report success in knitting backwards or to the left.


Knitting Tutorials - Knitting Patterns - Knitting Gallery - Little Dudes - Knitting Books - Yarn Storage - Knitting Links

Find me on Ravelry as kimberlychapman

Back to the Crafts Page.


Back to kimberlychapman.com.

Use this link to view this page with my preferred colour and font settings.

Page last updated January 31, 2006.

Email me at crafts@kimberlychapman.com


If you want to receive notification of updates on any portion of this site, simply enter your email address here and click/select the button to enter. You will be required to sign up for a free Yahoo! account to complete registration. Please note that Yahoo!'s privacy policy and other management are outside of kimberlychapman.com's responsibility. Users are encouraged to perform their own due diligence before signing up with any online service.

To find out more about the list or read messages without signing up, please visit the Yahoo! page for the kimberlychapman updates mailing list.

Subscribe to kimberlychapman

Powered by groups.yahoo.com


A-Prompt A[d] Best viewed with ANY browser[d] Valid HTML 4.01![d] Valid CSS![d] Level A conformance icon, W3C-WAI Web Content Accessibility Guidelines 1.0[d]
Labelled with ICRA[d] SafeSurf Rated[d] Made with Notepad[d] This Site Is Green[d]

For more information on what these tags mean, please see About KimberlyChapman.com.