 [d]
[d]
See the gallery for more photos.
Copyright © 2005-2008, Kimberly Chapman. All knitting graphics/patterns/instructions on this page were created by Kimberly Chapman. You may link to this page, but please do not steal/hotlink the graphics or copy the patterns to other sites without my written permission. Feel free to print graphics/patterns/instructions for personal or non-profit use, but absolutely no for-profit reproduction is allowed, including selling of finished items (except for registered charitable causes).
Yarn: Red Heart Supersaver Acrylic in 4334 Buff Fleck, 312 Black for optional ruffle
Needles: US 3 double-pointed (see my double-pointed needle tutorial to learn how they work), plus lots of spare needles of that size or smaller for optional ruffle
The cap is made using a variation on Val's Original Yarnball Pattern, as follows (if you are not familiar with this pattern, it is highly recommended that you practise with it first until you understand the fundamentals of how it works):
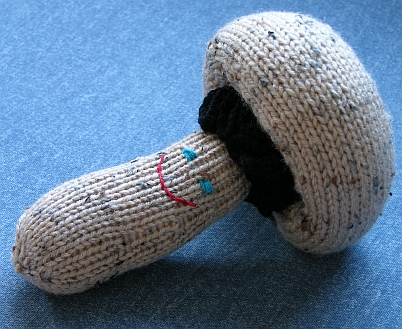
As you stuff and sew up the ball, put a large, flat-style squeaker in the top third of the stuffing (if you do not wish to include a squeaker, you should put in something else wide and flat, such as a piece of rigid plastic). Finish sewing up the ball, but instead of cutting the seaming yarn, use a long tapestry/yarn needle to sew up through the ball and around the squeaker, then through the top centre. Go back down through and around the squeaker on the opposite side, all the way down to the bottom centre. Pull the yarn tight to draw up the bottom towards the top to flatten out the ball and make a mushroom cap shape. Repeat as necessary until the shape is somewhat stable, varying the angle of your sewing so that you're sort of wrapping the yarn around the squeaker on the inside, but not so close as to puncture or collapse it. It may take some massaging of stuffing to acheive the desired shape.
The ruffle is optional, since it's a pain in the butt to make because it expands quickly and beyond the capacity of a standard needle set (the tension will start bending your needles and make it impossible to proceed without adding more). It is actually a hyperbolic expansion. For the daring, here's how to make it (you will need plenty of extra DPNs in size 3 or smaller):
Cast on 18 sts (6 stitches per needle, 18 total).
Inc 1 into every stitch for one round (12 stitches per needle, 36 total).
Inc 1 into every stitch for another round (24 per needle if still using three, 72 stitches total). Depending on how tightly you knit, you probably already have to start putting some stitches on extra needles. You can use smaller needles as temporary holders.
Inc 1 into every stitch for one round (144 stitches total, which is sort of gross, ha ha ha...). By now you are probably regretting this. You can stop now and bind off on the next round if your ruffle is wide enough to satisfy you. If not, proceed...
Inc 1 into every stitch for one round (288 stitches total). At this point it ought to be wide enough and you've probably started using bits of wire and anything else you can find to hold the insane number of stitches. Bind off on the next row as loosely as you can (you may want to go up a needle size for this). You should now have a big fat ruffle with a hole in the middle. Go have some chocolate or some other beloved treat; you've earned it!
(Yes, it would be easier in crochet, but I don't know how to crochet. And yes, starting from the outside and working in might work but only if you know exactly how to reduce to get the right size of hole for the stem. Besides, those solutions are dangerously sensible and not hardly as much fun!)
Cast on 15 sts (5 5 5)
Knit ten rounds.
Inc 1 at the start of each needle (6 6 6)
Knit 5 rounds.
Inc 1 at the start of each needle (7 7 7)
Knit 7 rounds.
Inc 1 at the start of each needle (8 8 8)
Knit 10 rounds.
P2tog at the start of each needle (7 7 7)
P2tog at the start of each needle (6 6 6)
P2tog all around (3 3 3)
P3tog all around (1 1 1)
Break yarn and pull through tight, feed end up through to secure.
If you skipped the ruffle, simply stuff the stem and sew it to the underside of the cap. If you've made the ruffle (kudos), pin it around the top edge of the stuffed stem and sew the whole thing to the underside of the cap. The ruffle will want to sproing away a lot, so you'll have to go slowly and patiently to get it all secure.
Embroider on a face, if desired.

Don't like my colour and font style? View this page in your default settings.
Page last updated July 2 2007.
Email me at crafts@kimberlychapman.com
If you want to receive notification of updates on any portion of this site, simply enter your email address here and click/select the button to enter. You will be required to sign up for a free Yahoo! account to complete registration. Please note that Yahoo!'s privacy policy and other management are outside of kimberlychapman.com's responsibility. Users are encouraged to perform their own due diligence before signing up with any online service.
To find out more about the list or read messages without signing up, please visit the Yahoo! page for the kimberlychapman updates mailing list.
For more information on what these tags mean, please see About KimberlyChapman.com.